Table of Contents
Introduction:
Are you looking for a powerful form builder plugin for your WordPress website? Look no further than Ninja Forms! Ninja Forms is a popular WordPress plugin that allows you to create and customize any type of form, from simple contact forms to complex registration forms, surveys, and more. With its easy-to-use drag and drop interface and flexible settings, Ninja Forms is the perfect solution for any website owner looking to improve their lead generation, user engagement, or data collection. In this comprehensive guide, we’ll take a deep dive into the world of Ninja Forms plugin and explore all its features and capabilities.
Chapter 1:
What is Ninja Forms plugin? In this chapter, we’ll provide an overview of Ninja Forms, including its history, popularity, and unique features. We’ll also discuss how Ninja Forms plugin compares to other form builder plugins and why it’s a top choice for many WordPress users.
Ninja Forms is a popular WordPress plugin that allows users to create and customize any type of form, from simple contact forms to complex registration forms, surveys, and more. The plugin is known for its user-friendly drag and drop interface, extensive customization options, and flexibility in integration with third-party services. Ninja Forms plugin can be used for a variety of applications, such as lead generation, data collection, and user engagement. It’s a powerful tool for website owners who want to improve the functionality and user experience of their WordPress sites. The plugin is free to download and use, and additional features and add-ons are available for purchase.
Chapter 2:
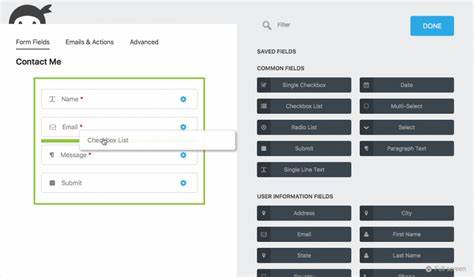
Getting Started with Ninja Forms plugin In this chapter, we’ll guide you through the process of installing and setting up Ninja Forms on your WordPress website. We’ll cover how to create your first form, add fields, and customize the form settings to fit your needs.

Chapter 3:
Customizing Your Forms In this chapter, we’ll explore the various customization options available with Ninja Formsplugin, including styling, formatting, and conditional logic. We’ll also show you how to integrate your forms with third-party services such as email marketing software, CRM tools, and payment gateways.
Customizing your forms with Ninja Forms plugin is an essential part of creating a great user experience for your website visitors. In this chapter, we’ll show you how to take your forms to the next level by customizing them to fit your branding, adding conditional logic, and integrating with third-party services.
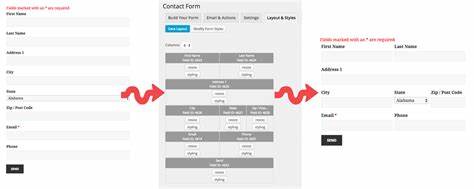
Step 1: Customize the Appearance of Your Forms
The first step in customizing your forms is to change the appearance to match your website’s branding. To do this, follow these steps:
- Navigate to the “Style” tab in the form builder.
- Choose the form element you want to customize, such as the form container, fields, or buttons.
- Customize the appearance of the form element by changing the font, color, size, and other options.
- Preview your changes and click “Save Form” to apply them.
Step 2: Add Conditional Logic to Your Forms
Conditional logic is a powerful feature of Ninja Forms plugin that allows you to show or hide form fields based on user input. This can help simplify the form and make it easier for the user to complete. To add conditional logic to your forms, follow these steps:
- Navigate to the “Fields” tab in the form builder.
- Click on the field you want to add conditional logic to.
- Click the “Advanced” tab.
- Choose the condition you want to set, such as showing or hiding the field based on the value of another field.
- Set the condition to apply to the field and click “Save Field.”
Step 3: Integrate with Third-Party Services
Ninja Forms plugin integrates with many third-party services, allowing you to easily connect your forms to your favorite tools. To integrate with third-party services, follow these steps:
- Navigate to the “Settings” tab in the form builder.
- Click on the integration you want to set up, such as Mailchimp or PayPal.
- Follow the steps to connect your account and configure the integration settings.
- Save the integration settings and test to ensure it’s working properly.

Chapter 4:
Advanced Features of Ninja Forms plugin In this chapter, we’ll dive into some of the more advanced features of Ninja Forms, including form calculations, multi-page forms, and file uploads. We’ll also cover how to use Ninja Forms for more complex applications such as surveys, quizzes, and registration forms.
Ninja Forms plugin is a powerful form plugin for WordPress that provides a wide range of advanced features to take your forms to the next level. In this chapter, we’ll explore some of the advanced features of Ninja Forms, such as multi-part forms, file uploads, and form submissions to external databases.
Step 1: Create Multi-Part Forms
Multi-part forms are forms that are split into multiple pages or sections, making it easier for the user to complete. To create multi-part forms with Ninja Forms plugin, follow these steps:
- Navigate to the “Fields” tab in the form builder.
- Click on the field you want to include on a separate page.
- Click the “Advanced” tab.
- Choose the page you want to move the field to, and click “Save Field.”
- Repeat this process for each field you want to move to a different page.
Step 2: Allow File Uploads
File uploads allow users to submit files, such as images, videos, or documents, along with their form submission. To allow file uploads with Ninja Forms plugin, follow these steps:
- Navigate to the “Fields” tab in the form builder.
- Click “Add a Field.”
- Choose the “File Upload” field.
- Customize the field settings, such as the file types allowed and maximum file size.
- Click “Add Field” to add the file upload field to your form.
Step 3: Submit Forms to External Databases
Ninja Forms plugin allows you to submit form data to external databases, such as Google Sheets, Zapier, or Salesforce. To submit forms to external databases, follow these steps:
- Navigate to the “Settings” tab in the form builder.
- Click on the integration you want to set up, such as Google Sheets or Zapier.
- Follow the steps to connect your account and configure the integration settings.
- Choose the data you want to submit to the external database and map the fields to the corresponding columns.
- Save the integration settings and test to ensure it’s working properly.
Chapter 5:
Improving Lead Generation with Ninja Forms In this chapter, we’ll discuss how Ninja Forms can help you generate more leads for your business by optimizing your forms for conversions. We’ll cover best practices for form design, form placement, and A/B testing.
Ninja Forms is a powerful tool for lead generation that allows you to create professional-looking forms that capture valuable information from your website visitors. In this chapter, we’ll explore some ways to improve lead generation with Ninja Forms, such as creating effective forms, integrating with email marketing services, and using form analytics to track performance.
Step 1: Create Effective Forms
Creating effective forms is the first step in improving lead generation with Ninja Forms. Effective forms should be easy to fill out and provide clear value to the user. To create effective forms, follow these steps:
- Keep your form simple and concise.
- Use clear, concise language in your form fields.
- Offer an incentive, such as a free ebook or discount, to encourage form completion.
- Use eye-catching design elements, such as images or icons, to make your form stand out.
- Test your form to ensure it’s working properly.
Step 2: Integrate with Email Marketing Services
Integrating with email marketing services allows you to automatically add new leads to your email list, making it easy to follow up with them and nurture the relationship. To integrate with email marketing services with Ninja Forms, follow these steps:
- Navigate to the “Settings” tab in the form builder.
- Click on the integration you want to set up, such as Mailchimp or Constant Contact.
- Follow the steps to connect your account and configure the integration settings.
- Choose the data you want to collect and map the fields to the corresponding email list fields.
- Save the integration settings and test to ensure it’s working properly.
Step 3: Use Form Analytics to Track Performance
Form analytics provide valuable insights into how your forms are performing, allowing you to make data-driven decisions to improve lead generation. To use form analytics with Ninja Forms, follow these steps:
- Navigate to the “Settings” tab in the form builder.
- Click on the “Analytics” tab.
- Choose the analytics tool you want to use, such as Google Analytics or MonsterInsights.
- Follow the steps to connect your account and configure the analytics settings.
- Use the analytics data to identify areas for improvement and optimize your forms for lead generation.
Chapter 6:
Ninja Forms Add-Ons In this chapter, we’ll introduce you to some of the many add-ons available for Ninja Forms. We’ll cover add-ons for integrating with third-party services, adding advanced functionality to your forms, and improving your form’s user experience.
Ninja Forms offers a wide range of add-ons that allow you to extend the functionality of your forms and take your form building to the next level. In this chapter, we’ll explore some of the most popular Ninja Forms add-ons, such as PayPal Express, User Management, and Conditional Logic.
Step 1: PayPal Express
PayPal Express is a Ninja Forms add-on that allows you to integrate PayPal payments into your forms. With PayPal Express, you can create order forms, donation forms, and more, and accept payments directly from your website. To use PayPal Express with Ninja Forms, follow these steps:
- Purchase and install the PayPal Express add-on from the Ninja Forms website.
- Navigate to the “Settings” tab in the form builder.
- Click on the “Payment” tab and choose “PayPal Express” as your payment processor.
- Follow the steps to connect your PayPal account and configure the payment settings.
- Add payment fields to your form and map them to the corresponding PayPal fields.
Step 2: User Management
User Management is a Ninja Forms add-on that allows you to create user registration forms, login forms, and more. With User Management, you can create a seamless user experience for your website visitors, and collect valuable user data. To use User Management with Ninja Forms, follow these steps:
- Purchase and install the User Management add-on from the Ninja Forms website.
- Navigate to the “Settings” tab in the form builder.
- Click on the “User Management” tab and choose the type of user form you want to create.
- Customize the form settings, such as the fields and user roles.
- Add the user form to your website and start collecting user data.
Step 3: Conditional Logic
Conditional Logic is a Ninja Forms add-on that allows you to show or hide form fields based on user responses. With Conditional Logic, you can create dynamic forms that adapt to the user’s needs and provide a more personalized experience. To use Conditional Logic with Ninja Forms, follow these steps:
- Purchase and install the Conditional Logic add-on from the Ninja Forms website.
- Navigate to the “Fields” tab in the form builder.
- Click on the field you want to apply conditional logic to.
- Click the “Advanced” tab and choose “Add New Rule.”
- Customize the rule settings, such as the trigger and the field to show or hide.
Chapter 7:
Troubleshooting and Support In this chapter, we’ll cover some common issues that may arise when using Ninja Forms and how to troubleshoot them. We’ll also discuss the support options available for Ninja Forms users, including documentation, forums, and customer support.
In this chapter, we’ll cover how to troubleshoot common issues that may arise when using Ninja Forms, as well as where to find support if you need help resolving a problem.
Step 1: Troubleshooting Common Issues
Here are some common issues that users may encounter when using Ninja Forms, and how to troubleshoot them:
- Forms not submitting: If you’re having trouble getting your forms to submit, there could be a number of reasons why this is happening. First, check to make sure that all required fields are completed and that there are no errors. If the problem persists, it’s possible that there is a conflict with another plugin or your theme. Try disabling other plugins or switching to a default theme to see if this resolves the issue.
- Emails not sending: If you’ve set up email notifications for your forms but they aren’t being sent, there are a few things you can check. First, make sure that your email settings are configured correctly. You can test this by sending a test email to yourself. If this doesn’t work, you may need to use an SMTP plugin to ensure reliable email delivery.
- Error messages: If you encounter an error message when trying to use Ninja Forms, take note of the message and search for a solution in the Ninja Forms documentation or support forum. It’s possible that the error is related to a specific issue or conflict that has already been resolved.
- Forms not displaying correctly: If your forms are not displaying correctly on your website, there may be a conflict with your theme or a caching plugin. Try clearing your cache or disabling your caching plugin to see if this resolves the issue.
Step 2: Finding Support
If you’re having trouble troubleshooting an issue on your own, there are a number of resources available for getting support with Ninja Forms:
- Documentation: The Ninja Forms website has a detailed documentation section that covers all aspects of using the plugin. This is a great place to start if you have a question or issue.
- Support Forum: The Ninja Forms support forum is a community of users and developers who can provide help and advice on using the plugin. You can search the forum for answers to your questions or post a question of your own to get help from the community.
- Premium Support: If you have a paid Ninja Forms license, you can access premium support directly from the plugin’s settings page. Premium support includes one-on-one assistance from the Ninja Forms support team.
Conclusion:
Ninja Forms is a powerful and flexible form builder plugin that can help you improve your website’s user experience, lead generation, and data collection. With its wide range of customization options, advanced features, and add-ons, Ninja Forms is the perfect solution for any website owner looking to create professional-looking forms with ease. By following the tips and best practices outlined in this guide, you’ll be able to get the most out of Ninja Forms and take your website to the next level.