Table of Contents
Introduction
Are you planning to migrate your website to a new WordPress installation? The WordPress Importer is a powerful tool that can help you quickly and easily move your website’s content to a new location.
how to use the WordPress Importer to migrate your website, including steps to export and import your website’s data
Step 1: Backup Your Website
Taking a backup of your website’s data is an essential step before you begin the migration process. This backup will ensure that you have a copy of your website’s data in case something goes wrong during the migration process. There are several ways to take a backup of your website’s data, but using a plugin like UpdraftPlus is the easiest and most reliable method.
UpdraftPlus is a popular backup plugin that allows you to take a complete backup of your website’s data, including the database, files, plugins, and themes. The plugin also allows you to schedule automatic backups, so you don’t have to remember to take a backup manually. Once you have installed and activated the plugin, you can configure the settings to take a backup of your website’s data.
Alternatively, you can also export your website’s content using the WordPress Export tool. This tool allows you to download an XML file containing all your website’s posts, pages, comments, custom fields, and categories. To use the WordPress Export tool, go to the WordPress dashboard and click on “Tools” and then “Export.” From there, you can select the content you want to export and download the XML file.
Taking a backup of your website’s data is a simple yet crucial step in the website migration process. By taking a backup, you can ensure that your website’s data is safe and secure, and you can easily restore your website to its original state if anything goes wrong during the migration process.
Step 2: Export Your Website’s Content
Exporting your website’s content is a straightforward process that can be done using the built-in WordPress Export tool. This tool allows you to download an XML file that contains all of your website’s content, including posts, pages, comments, and media.
To use the WordPress Export tool, log in to your WordPress dashboard and navigate to the “Tools” section. From there, click on the “Export” option, and you will be presented with a screen that allows you to select the content you want to export.
You can choose to export all of your website’s content, or you can select specific content to export. For example, you may want to export only the posts or pages that you have created. To do this, select the relevant option from the dropdown menu.
Once you have selected the content you want to export, click on the “Download Export File” button, and a file containing your website’s content will be downloaded to your computer. It’s important to note that the file may take some time to download, depending on the size of your website and the amount of content you have selected to export.
Exporting your website’s content using the WordPress Export tool is a quick and easy process that allows you to transfer your content to a new WordPress installation. By following the steps outlined in this blog, you can export your website’s content with ease and start the migration process.
Step 3: Set Up Your New WordPress Installation
After exporting your website’s content, you can set up your new WordPress installation by installing WordPress on your new server or hosting account. Once you have installed WordPress, simply log in to your new WordPress dashboard to start the migration process.
Step 4: Install and Activate the WordPress Importer Plugin
To import your website’s content to your new WordPress installation, you first need to install and activate the WordPress Importer plugin. This can be done by navigating to the “Plugins” section in your new WordPress dashboard and searching for “WordPress Importer” in the search bar.
Once you have found the WordPress Importer plugin, click on the “Install Now” button to install the plugin. After installation, click on the “Activate” button to activate the plugin.
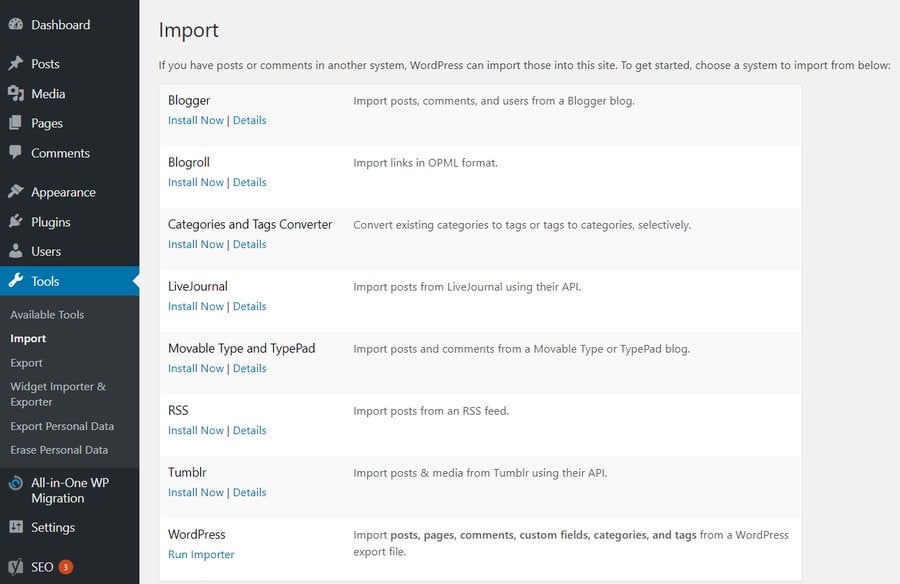
With the WordPress Importer plugin activated, navigate to the “Tools” section in your WordPress dashboard and select “Import.” From there, click on the “WordPress” option to launch the WordPress Importer tool. This tool allows you to import the XML file you exported earlier, which contains your website’s content.
Follow the on-screen instructions to import your website’s content into your new WordPress installation. Once the import process is complete, you should see all of your website’s content displayed on your new website.
Step 5: Import Your Website’s Content
To import your website’s content to your new WordPress installation, follow these steps:
- Install and activate the WordPress Importer plugin: Navigate to the “Plugins” section in your new WordPress dashboard and search for “WordPress Importer” in the search bar. Install the plugin and then activate it.
- Export your website’s content: Log in to your old WordPress dashboard and navigate to the “Tools” section. Click on “Export” and choose the content you want to export. Download the export file, which will contain all of the content you selected.
- Navigate to the “Import” tool: In your new WordPress dashboard, go to the “Tools” section and select “Import.” From there, click on “WordPress” as the import tool.
- Upload the export file: You will be prompted to upload the export file that you downloaded in Step 2. Once the file has been uploaded, the WordPress Importer will ask you to map the authors of the imported content to existing users on your new WordPress installation. You can also choose to import all of your website’s content or select specific content to import.
- Begin the import process: After selecting the options, click on the “Submit” button to begin the import process. The WordPress Importer will start importing your website’s content, and you will be notified once the process is complete.
It’s important to note that the WordPress Importer may not be able to import everything from your old website, particularly if you were using custom plugins or themes. You may need to manually migrate some of your content, or use other plugins or services to complete the migration process. However, the WordPress Importer is a great starting point for migrating your website’s content to a new WordPress installation.
Conclusion
In conclusion, the WordPress Importer is an essential tool for website migration that allows you to transfer your website’s content from one WordPress installation to another. With the steps outlined in this blog, you can export and import your website’s content with ease, while also taking a backup of your website’s data as a safety net. The WordPress Importer is an excellent option for those who want to move their website to a new server or hosting account, or even for those who want to create a local development environment.
It’s important to note that while the WordPress Importer is a powerful tool, it may not transfer all the data and information that your website contains. In some cases, you may need to manually transfer certain elements, such as plugins, themes, or custom code. It’s also essential to test your new WordPress installation thoroughly to ensure that everything is working correctly and to fix any issues that may arise.
Overall, the WordPress Importer is a great tool that simplifies the process of migrating your website’s content to a new location. With the proper backup and testing, you can use the WordPress Importer to make the migration process smooth and seamless.